How to configure event settings for Poll
1) Set the event flow
On the Flow tab you can set the event as live or 24/7. Options specific to each flow help you take your event a step further.
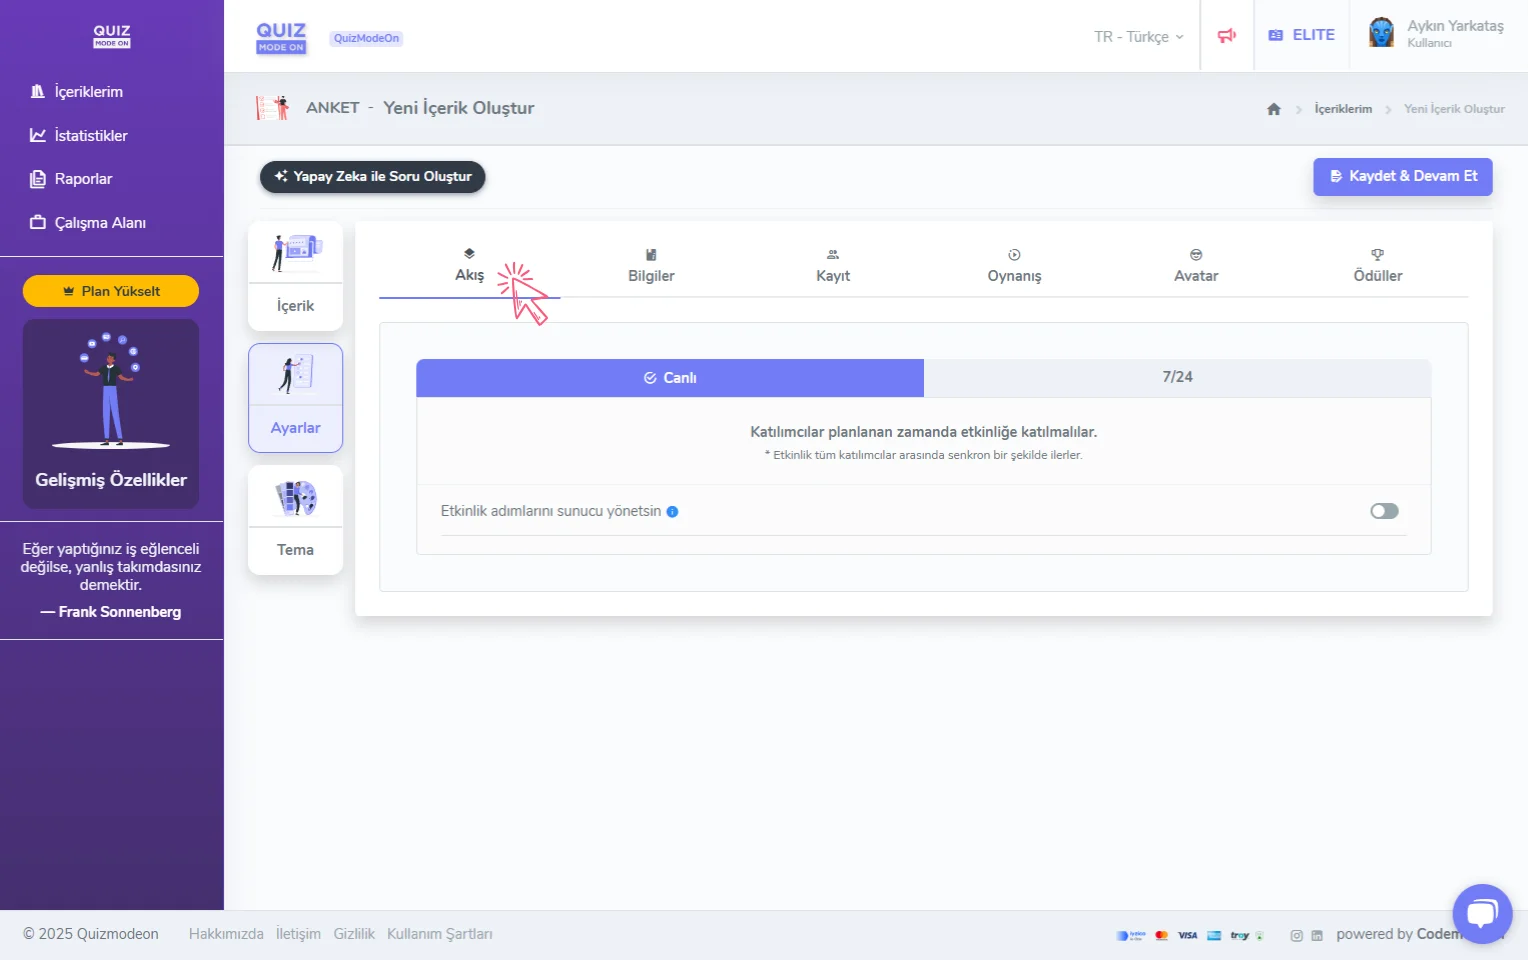
create a poll - settings - event flow
A) Live Flow
Choose the live flow for an event in which all participants join at the same time (interact synchronously).
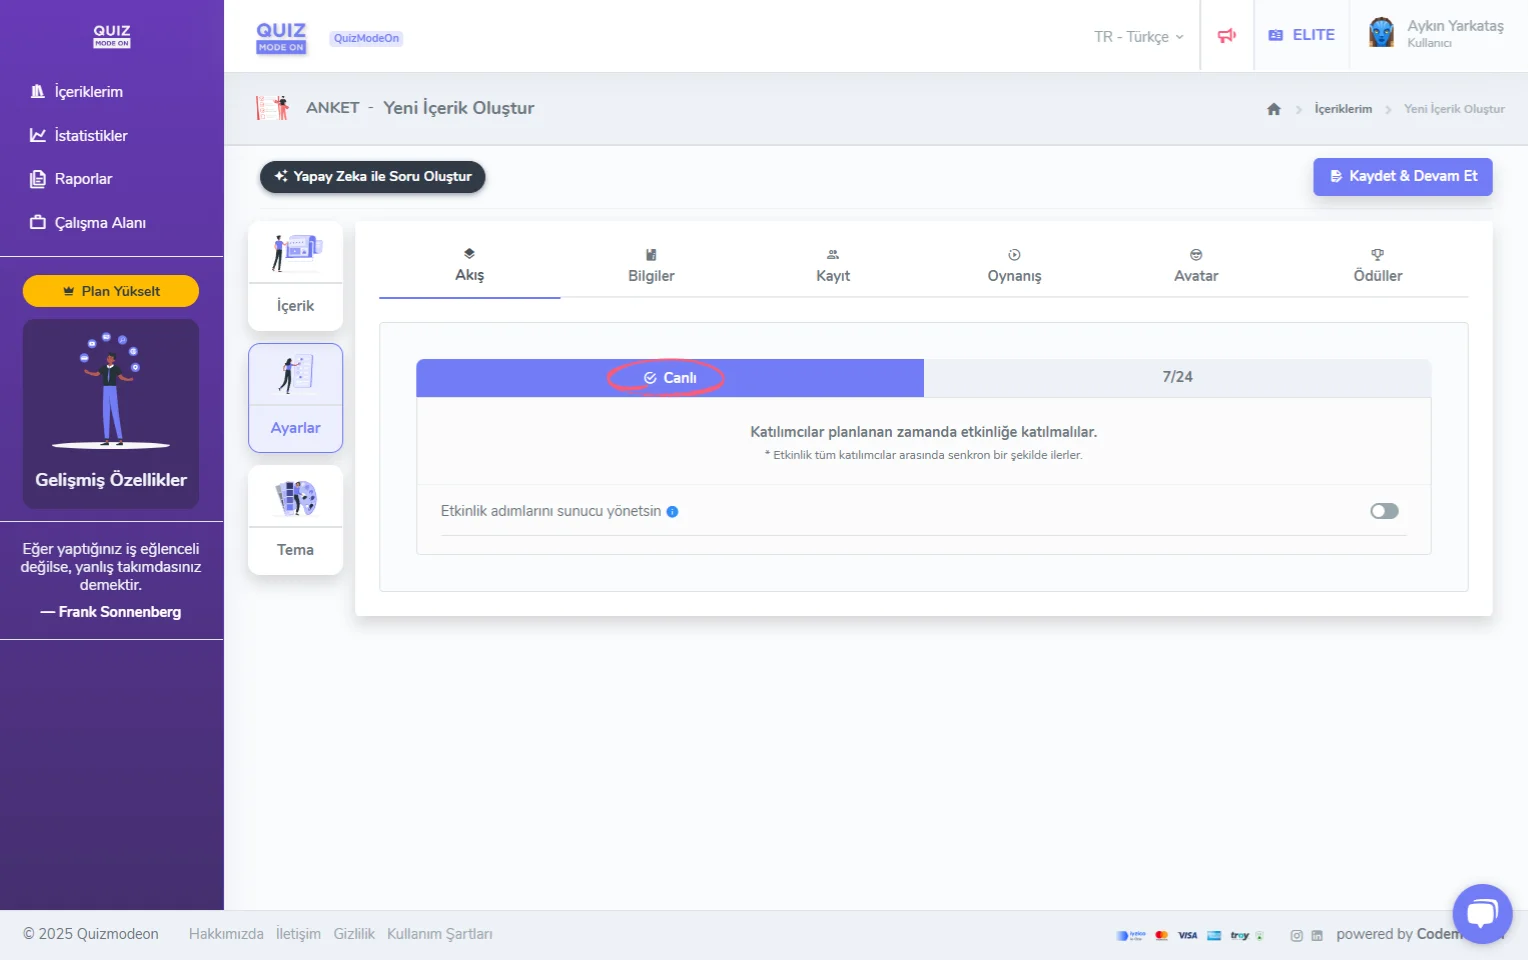
create a poll - settings - event flow - live
If the Let the presenter manage the event flow option is off, after the event starts the whole question flow moves forward automatically on its own (according to the question times). Starting the event is done by the moderator.
If the Let the presenter manage the event flow option is on, the whole flow of the event you created is controlled by a moderator. The actions under the moderator’s control are:
-
Starting the event
-
Sending the questions
-
Ending the event
B) 24/7 Flow
Choose the 24/7 flow so that all participants can join the event at different times from each other (during the period you set).
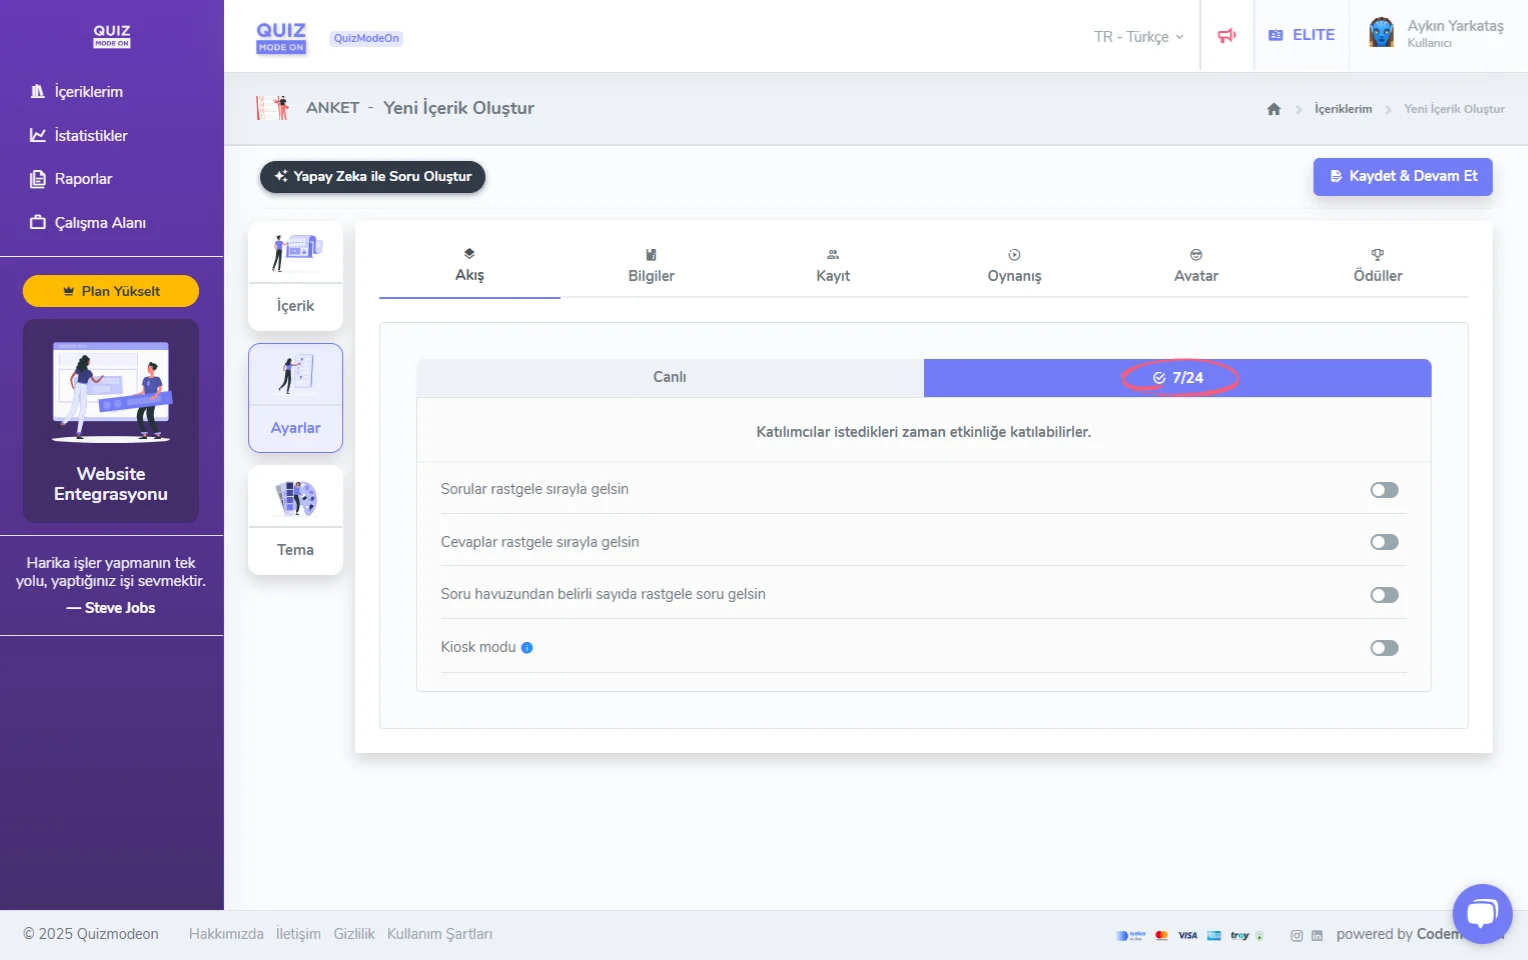
create a poll - settings - event flow - asynchronous (24/7)
Note: The default flow for a Poll event is 24/7.
If you turn the Shuffle questions for every participant option on, the order of all the questions you prepared is shuffled randomly and shown to participants in a different order.
If you turn the Shuffle answers for every participant option on, the options of the questions are shuffled randomly and shown to participants in a different order.
If you turn the Randomly load a specific number of questions for every participant option on, you can make a specific number of random questions come from all the questions you created in the content section. For example, if you prepare 20 questions in total and select 5 here, participants will answer 5 questions randomly selected from the 20.
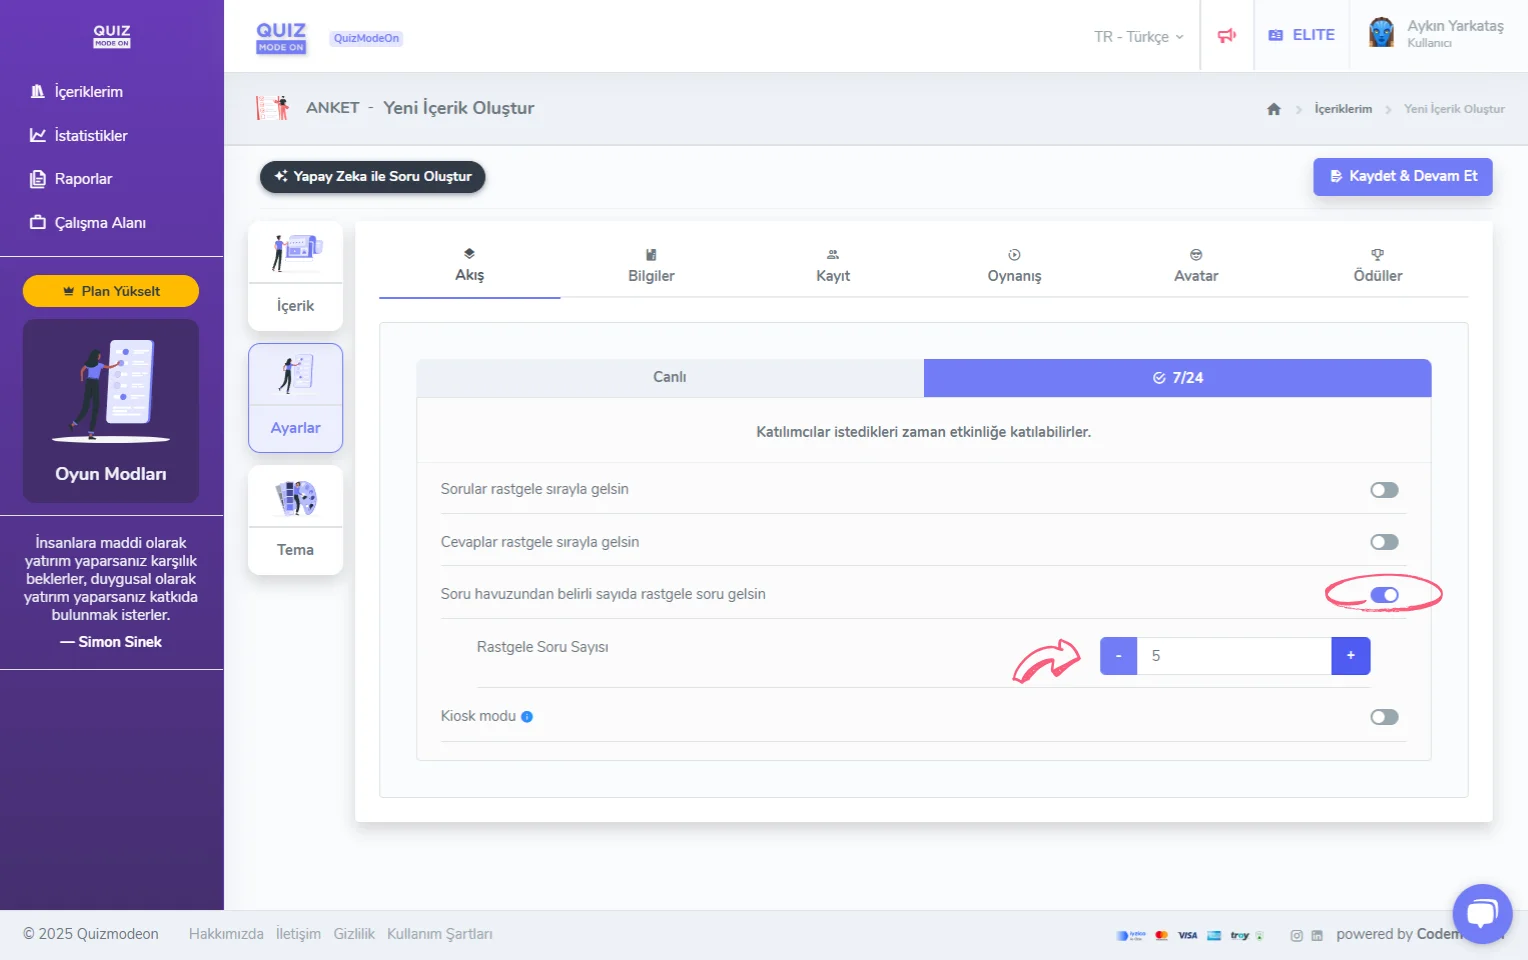
create a poll - settings - event flow - asynchronous (24/7) - question pool
Note: The Randomly load a specific number of questions for every participant option is generally used in events with prizes (knowledge competitions, exams, tests, etc.). Because participants can join the event at different times, it greatly reduces the chance of them seeing and answering the questions they saw from each other.
When Kiosk mode is turned on, you let participants log in and join the event one by one from a single device (kiosk, PC, phone, etc.). When a participant’s experience ends, after a short countdown the event returns to the start (participant login) screen, so new participants join by entering their details on the registration screen.
2) Enter the event information
On the Information tab you can define the participant limit, PIN, label and date settings.
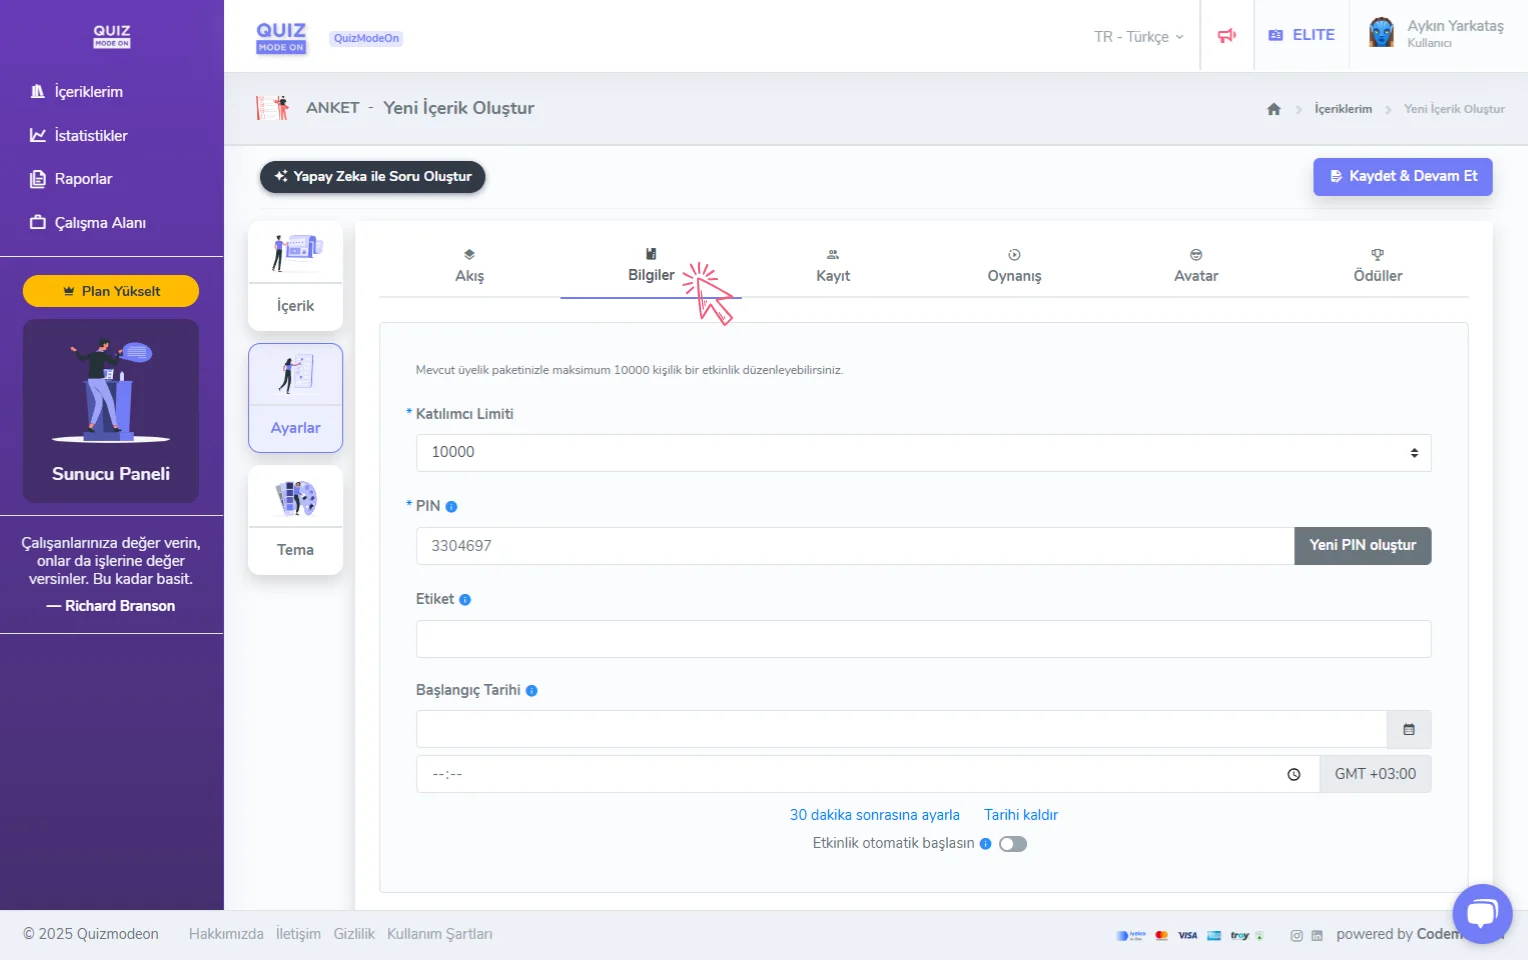
create a poll - settings - general information
The default value of the Participant Limit shows the maximum number of concurrent participants supported by your current membership plan. If you want to limit your event to fewer participants depending on your membership plan, you can change the settings here. For example: if you have a membership with a capacity of at most 100 people, you can also plan events for 100, 50, 20 and 5 people.
In the PIN section you can set a login code for the event you created. With the Generate a new PIN button, you can have the system set a random PIN code.
Note: Every event must have a unique PIN code. However, for a more practical and user-friendly experience, a Quick Access Link or QR code is usually shared. This way participants go straight to the registration screen without going to the PIN screen and join the event faster. The QR code and access link shown on the moderator screen are quick access links without a PIN.
The few words you enter in the Label field will help you search for and find your past events more easily. You can quickly reach the content you are looking for by typing your label in the search box on the My Content page.
In the Start Date field, you can enter the date and time the event will start. This way, a countdown with the event start time is shown both on the moderator screen and on the participants’ lobby screen. It is not a mandatory field.
If you turn the Automatic Start option on, your event will start automatically at the date and time you set.
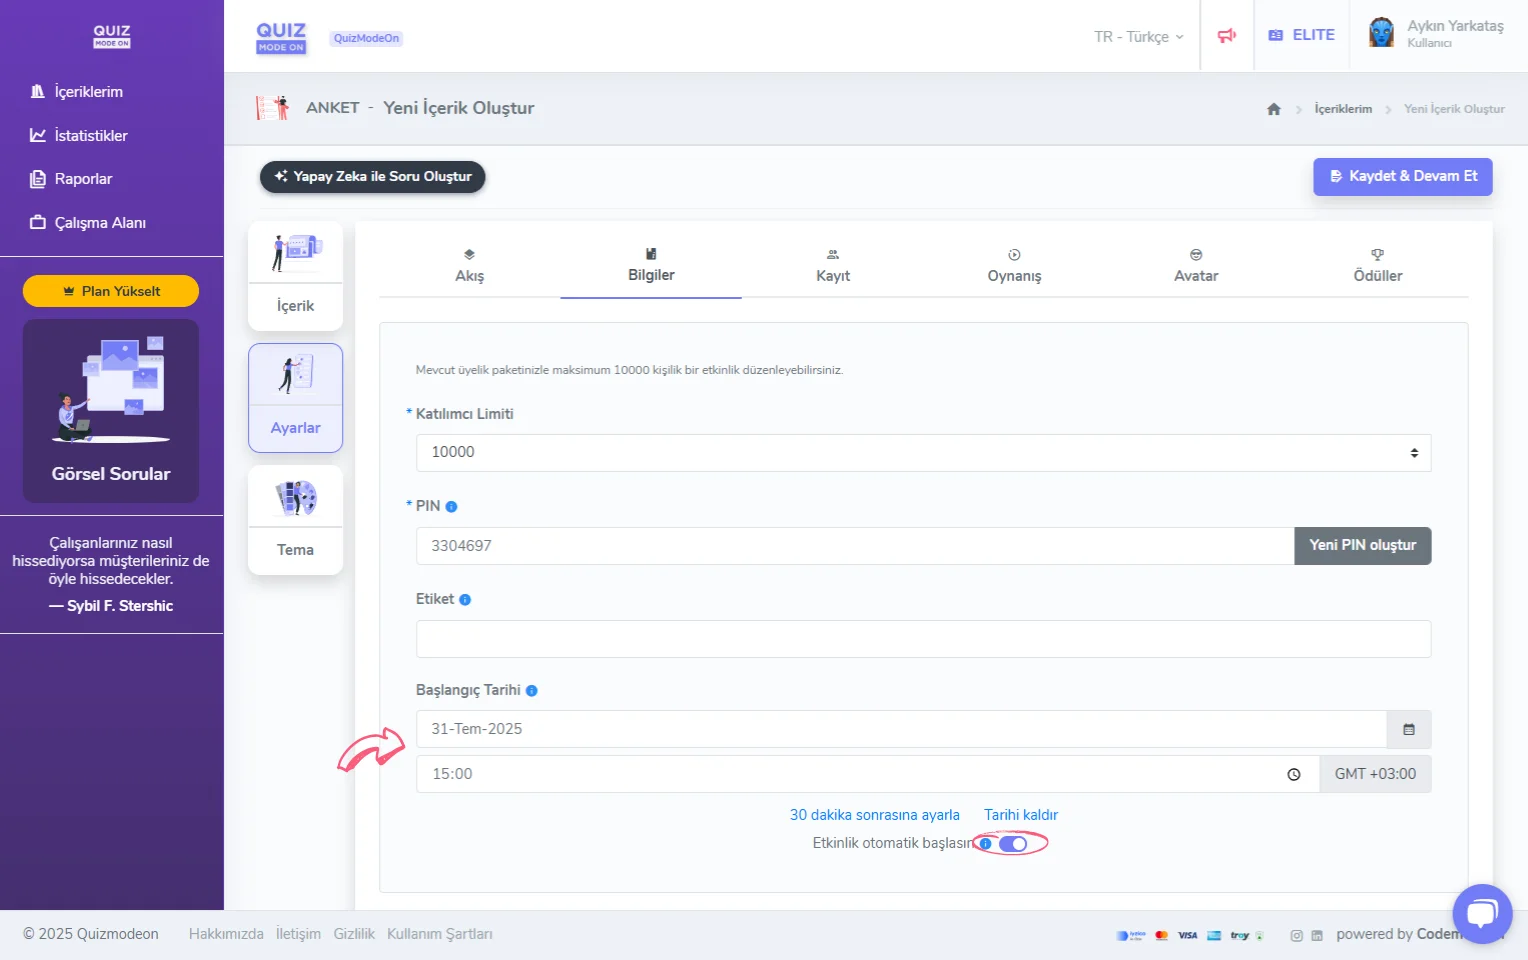
create a poll - settings - general information - auto start - start date
3) Define registration and login settings for participants
On the Registration tab you can collect participants’ Name Surname, Avatar, Email, Phone and ID details.
Besides the details above, during registration you can also define custom fields such as gender, city, occupation, school, dealer name, branch code, department and shift hours, and ask participants for them. This comprehensive feature is available only to ENTERPRISE users.
You can select and turn on the registration details you want, and set some rules.
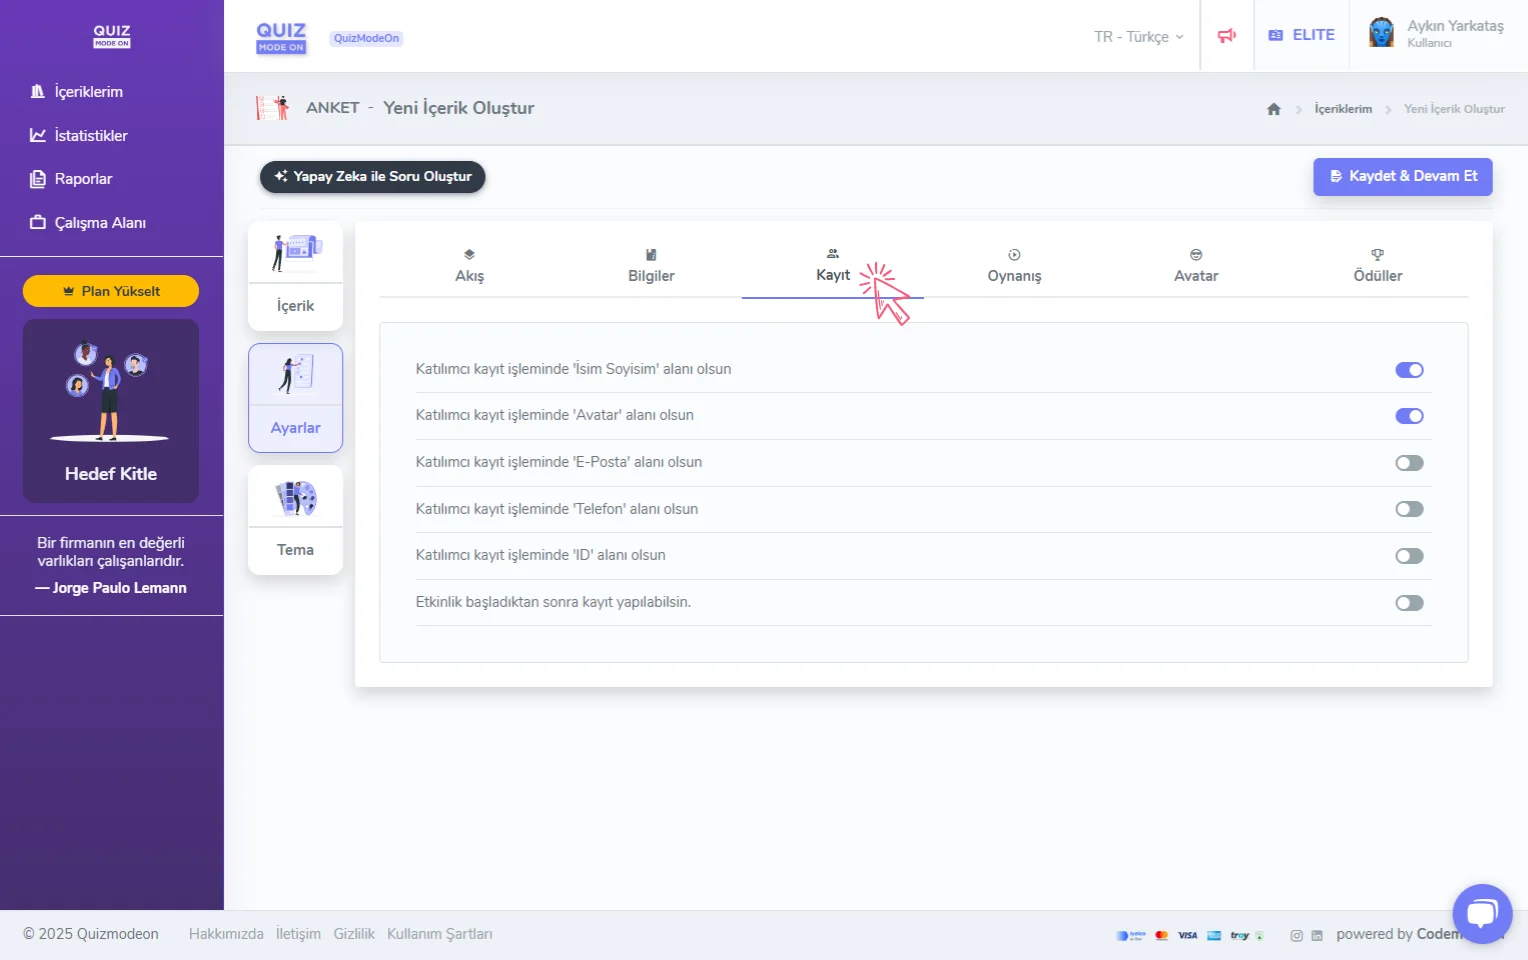
create a poll - settings - participant registration details
Note: Participants cannot leave any of the registration details shown on the login screen empty. Do not forget to take this into account when you ask for one of these details.
When you turn the Email option on, additional options open so you can make more detailed settings. These comprehensive features are available only to ENTERPRISE users.
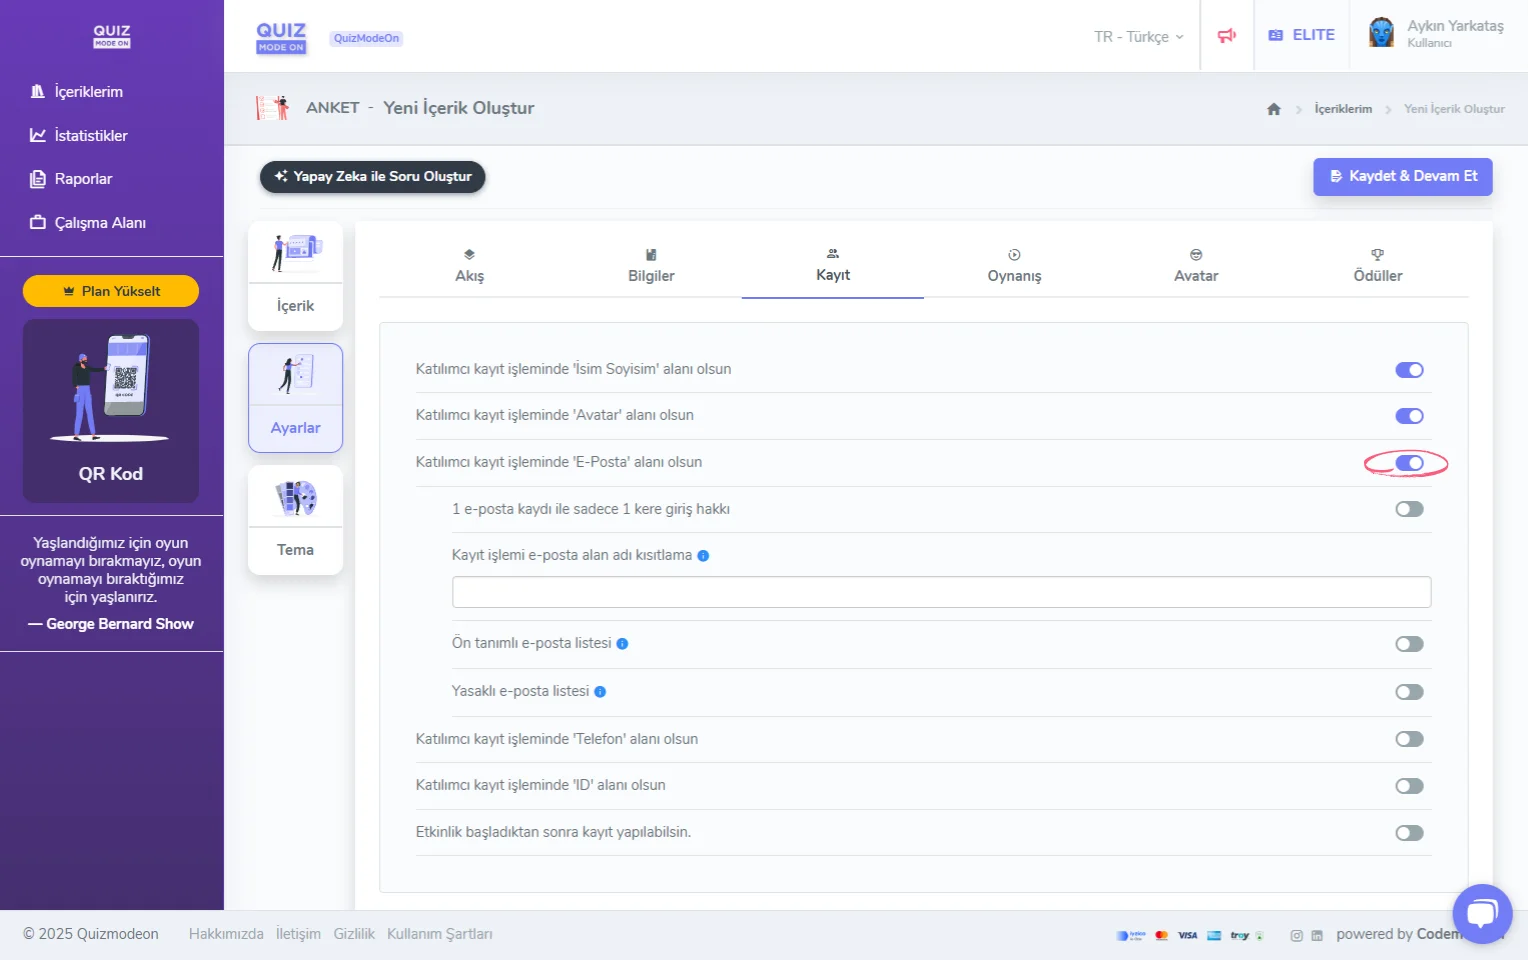
create a poll - settings - participant registration details - email
-
1 login right per 1 email registration: The same email address cannot be used to log in again. This way you prevent duplicate registrations. When a participant tries to log in with the same email address, they see the warning “You cannot log in again because a registration was already made for this event with this email address.”
-
Registration email domain restriction: Only participants with the email extension set here can log in to the event. If you want to enter more than one email domain, you can add new ones with the “enter” or ”,” keys. When a participant without a defined email extension tries to log in, they see the warning “You cannot use this email to join this event.”
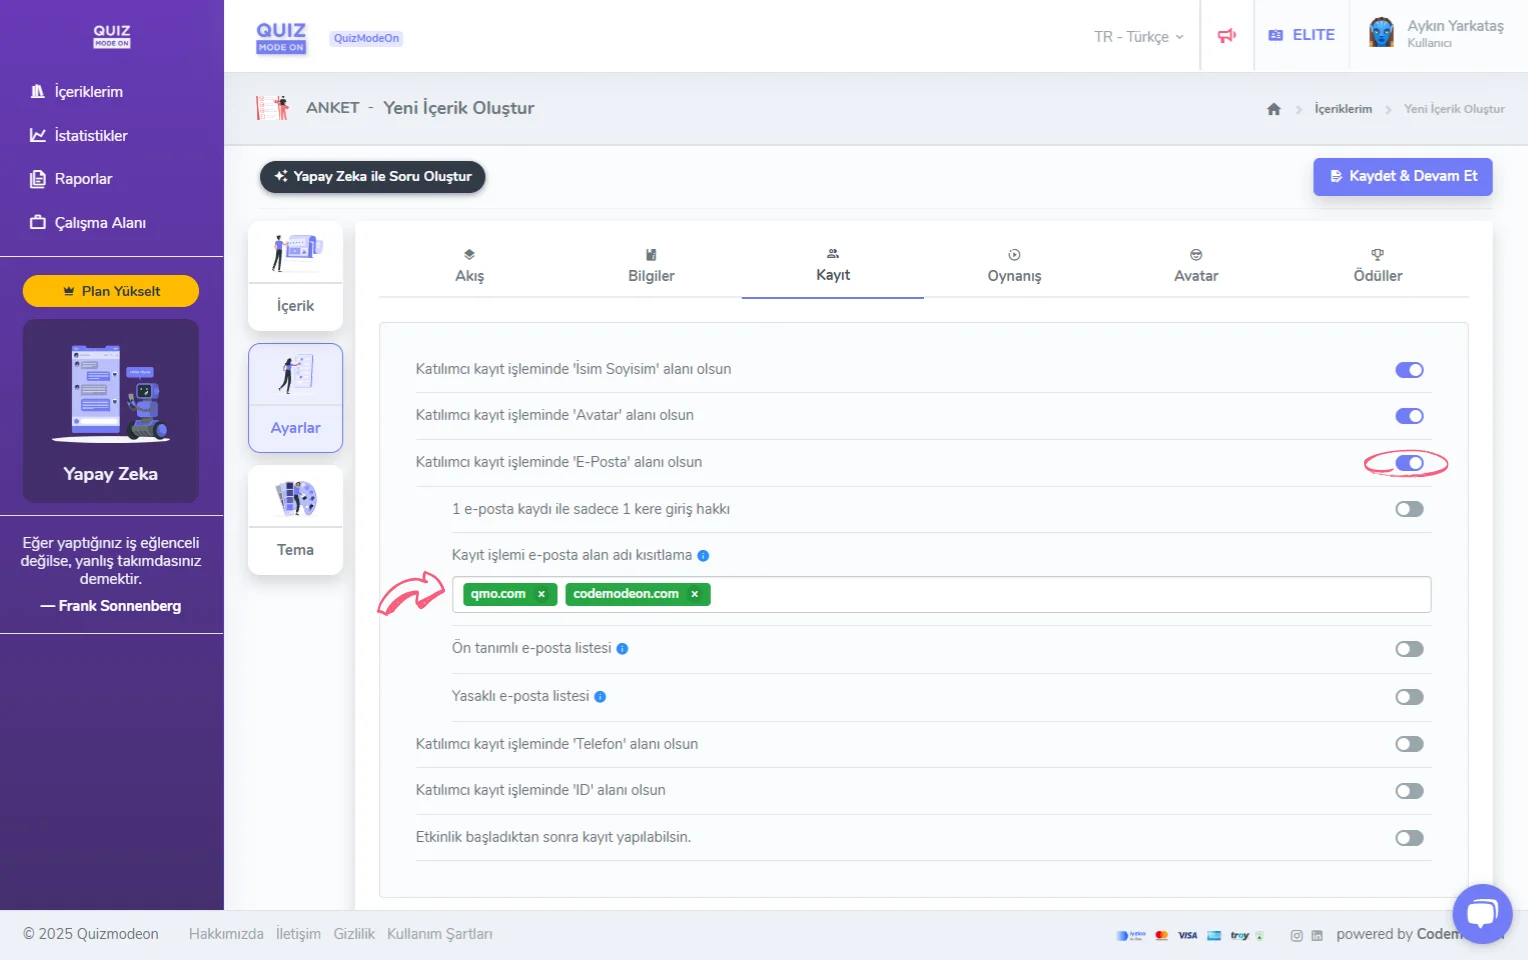
create a poll - settings - participant registration details - email - domain restriction
- Predefined email list: If there is a specific group of participants you want to join the event, you can upload their email addresses in Excel format. When a participant who is not on the predefined email list tries to log in, they see the warning “Your user info is invalid. Please check your info and try again.”
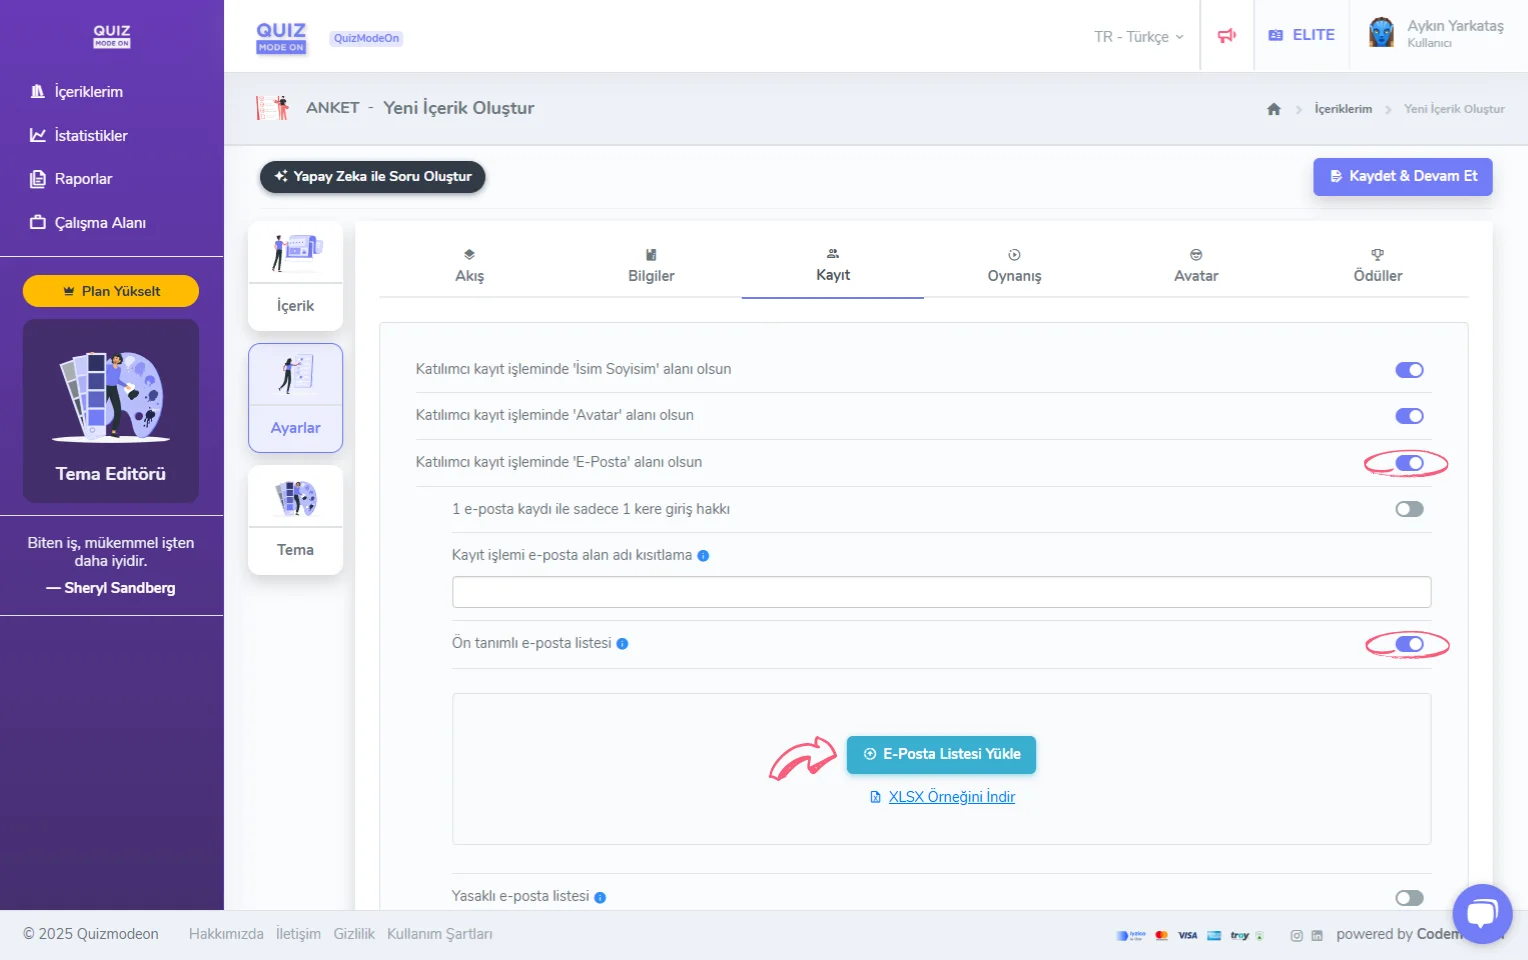
create a poll - settings - participant registration details - email - predefined email list
- Banned email list: If there is a specific group of participants you do not want to join the event, you can upload their email addresses in Excel format. When a participant on the banned email list tries to log in, they see the warning “Your user info is invalid. Please check your info and try again.”
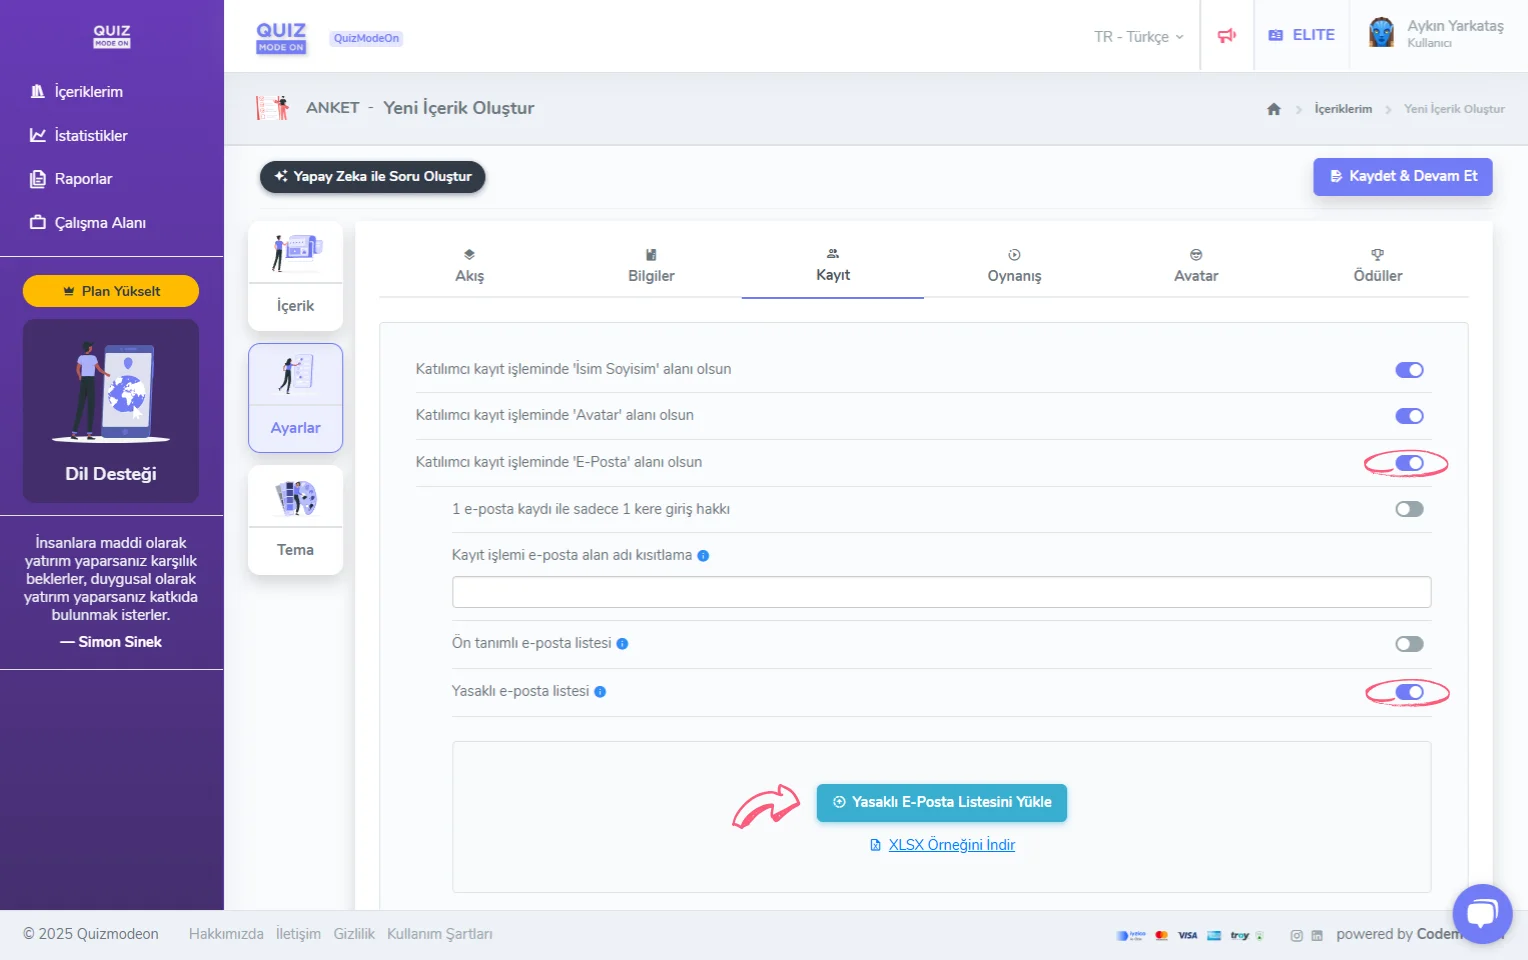
create a poll - settings - participant registration details - email - banned email list
When you turn the Phone option on, additional options open so you can make more detailed settings. These comprehensive features are available only to ENTERPRISE users.
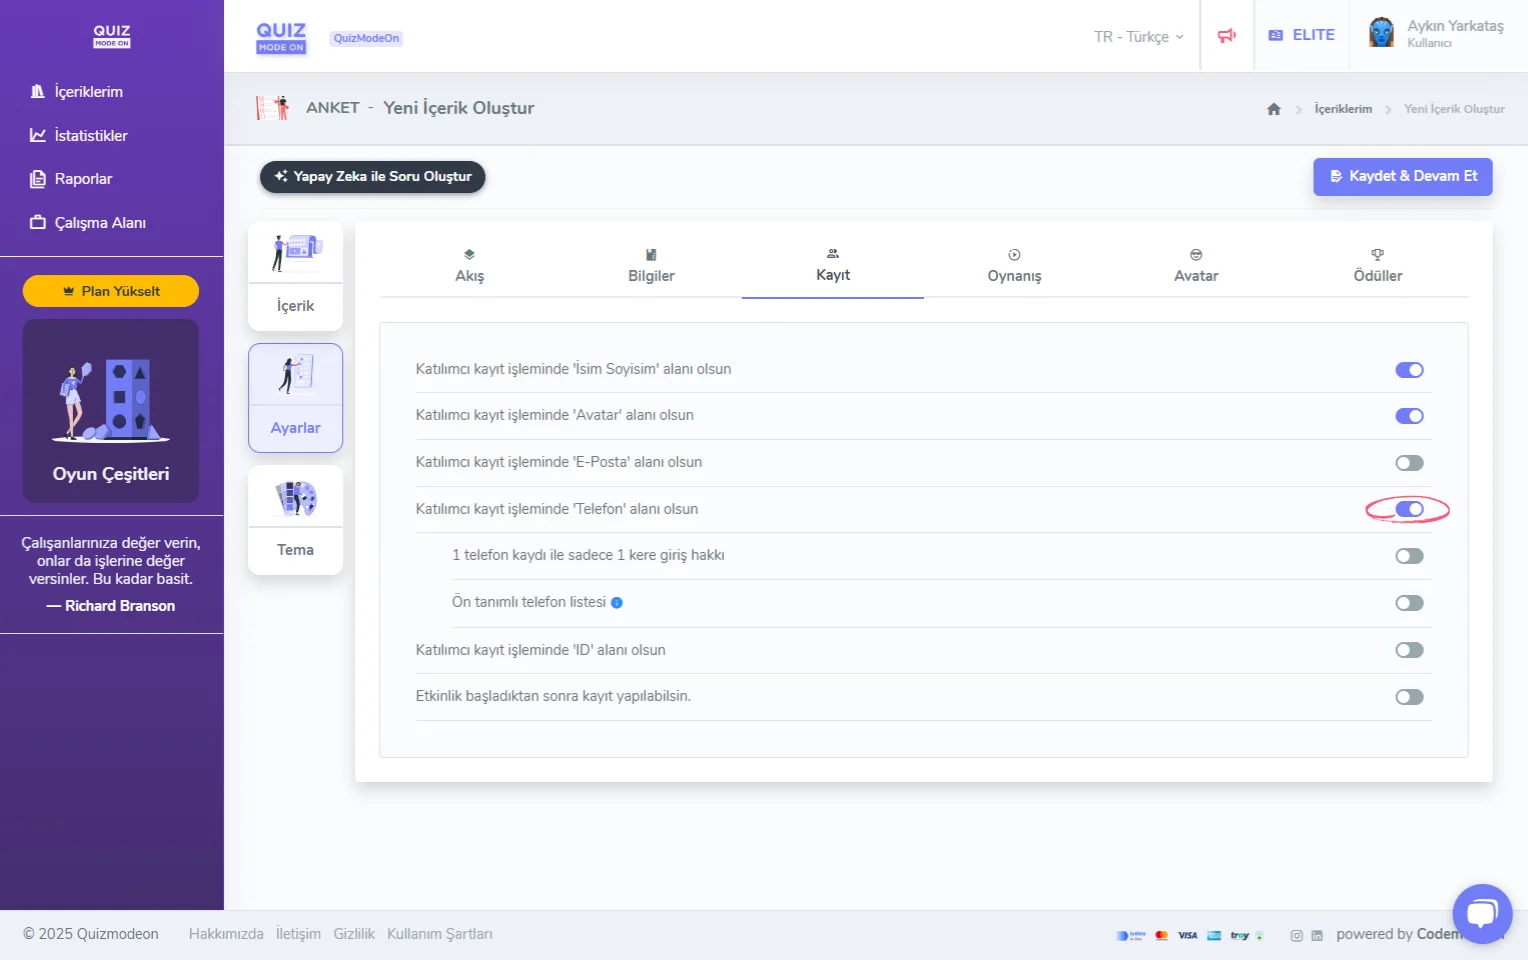
create a poll - settings - participant registration details - phone
- 1 login right per 1 phone registration: The same phone number cannot be used to log in again. This way you prevent duplicate registrations. When a participant tries to log in with the same phone number, they see the warning “You cannot log in again because a registration was already made for this event with this phone number.”
- Predefined phone list: If there is a specific group of participants you want to join the event, you can upload their phone numbers in Excel format. When a participant who is not on the predefined phone list tries to log in, they see the warning “Your user info is invalid. Please check your info and try again.”
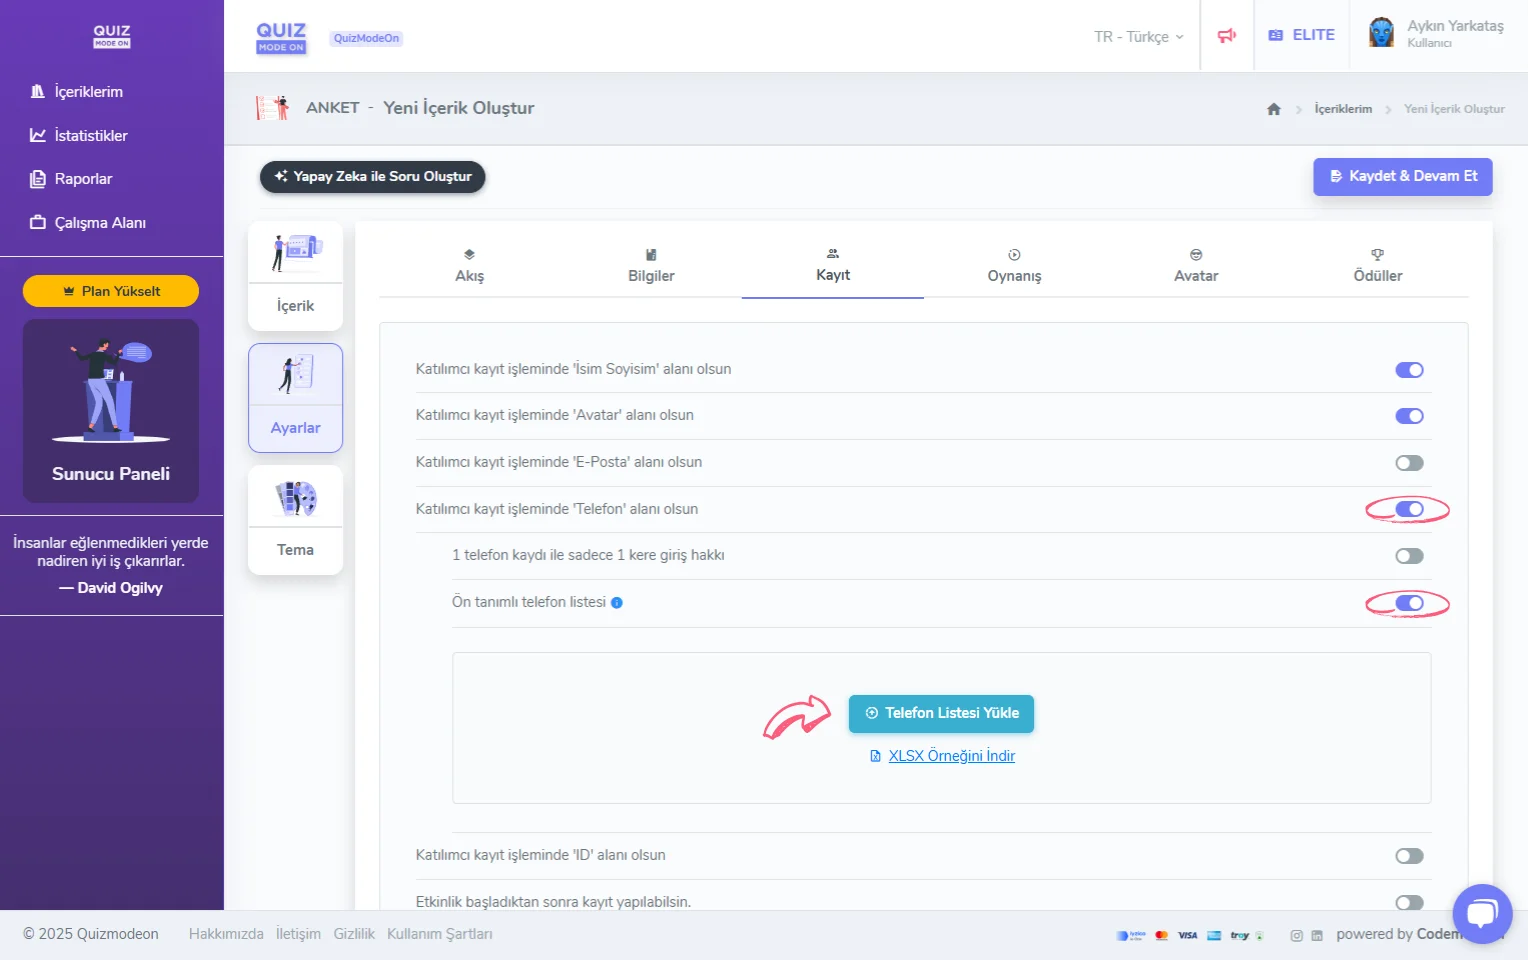
create a poll - settings - participant registration details - phone - predefined phone list
When you turn the ID option on, additional options open so you can make more detailed settings. These comprehensive features are available only to ENTERPRISE users.
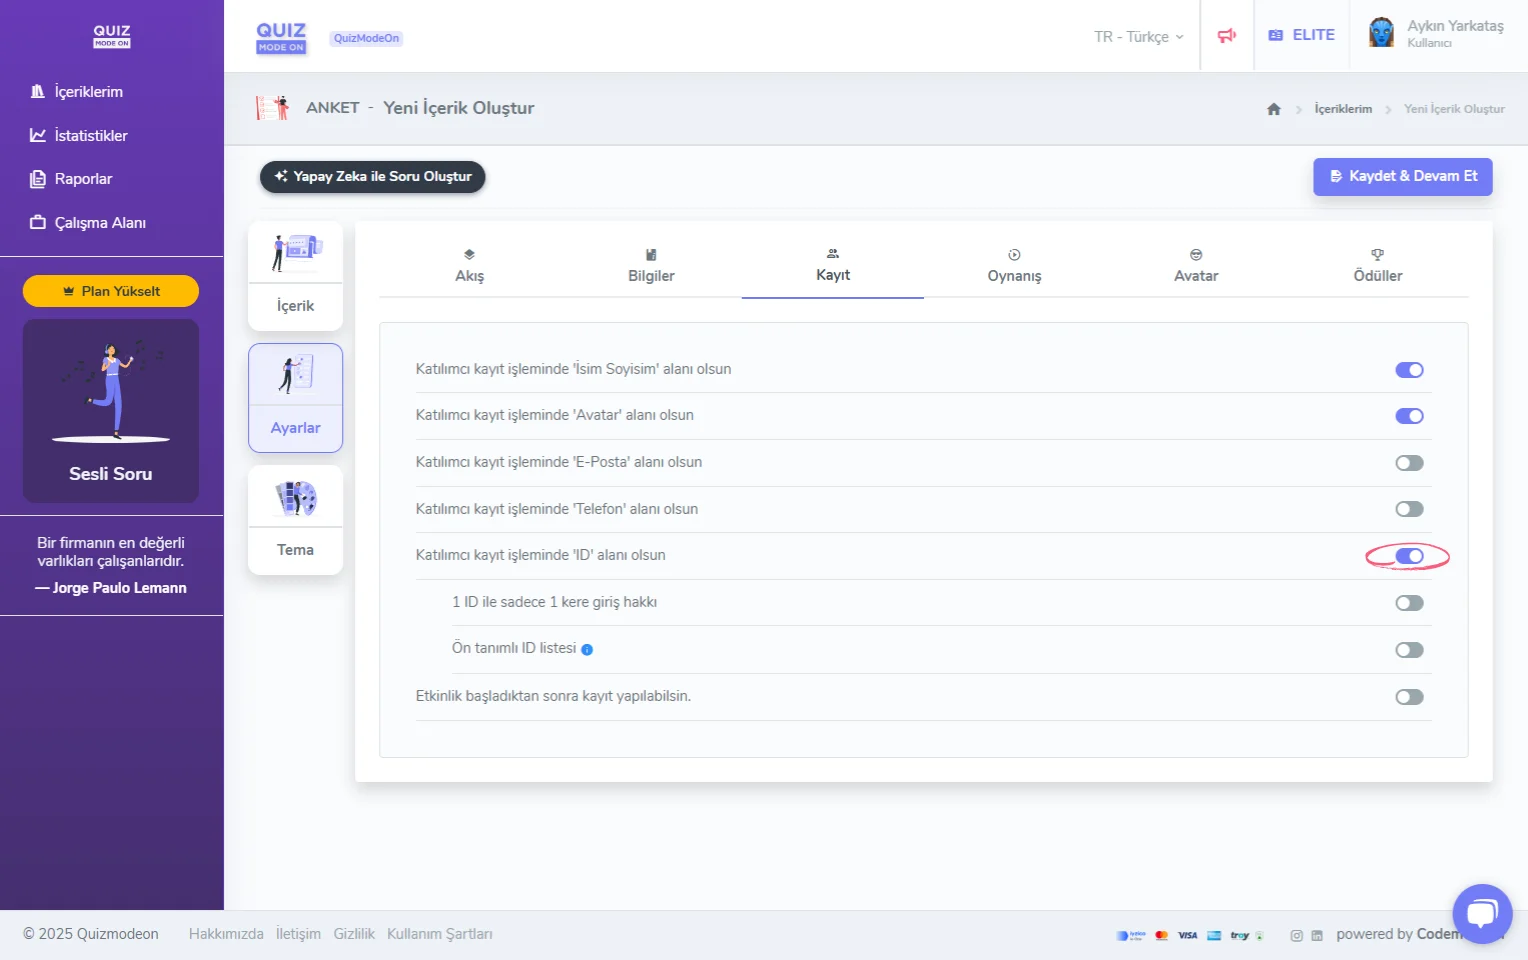
create a poll - settings - participant registration details - ID (unique number)
- 1 login right per 1 ID: The same ID cannot be used to log in again. This way you prevent duplicate registrations. When a participant tries to log in with the same ID, they see the warning “You can’t use this ID because it’s already used for this event.”
- Predefined ID list: If there is a specific group of participants you want to join the event, you can upload their IDs in Excel format. When a participant who is not on the predefined ID list tries to log in, they see the warning “Your user info is invalid. Please check your info and try again.”
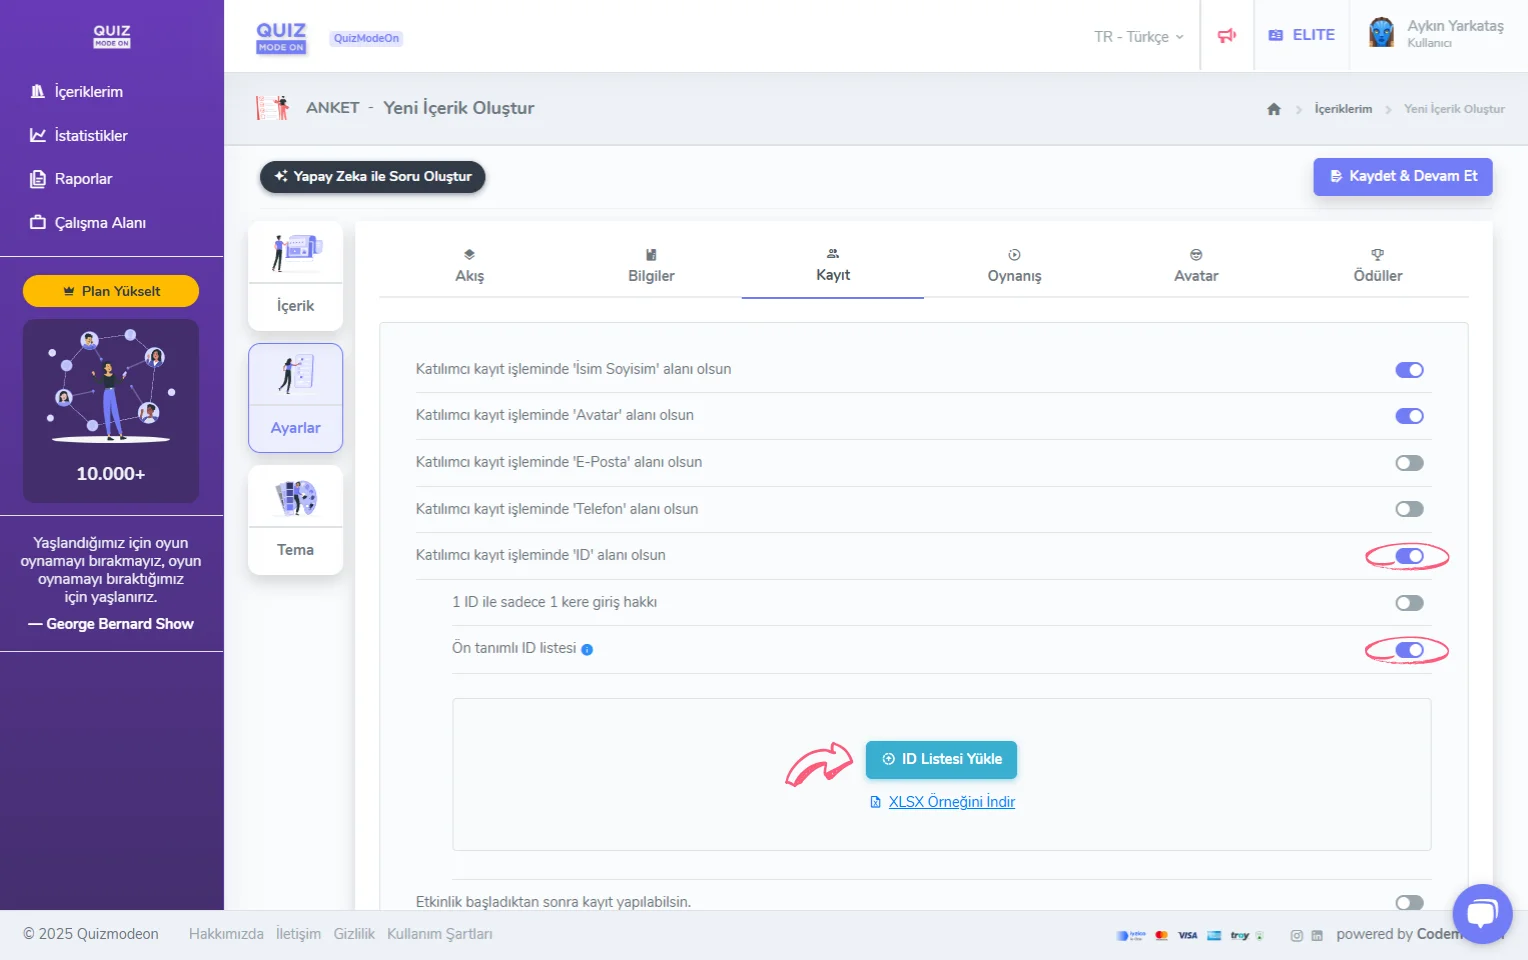
create a poll - settings - participant registration details - ID (unique number) - predefined ID list
When you turn the Allow registration after the event has started option on, in events defined with a live flow, participants can also register and log in after the event has started. If this option is not selected, participants who try to log in after the event has started see the warning “You can’t enter right now because this event has already started.” and cannot log in.
Note: The default value of the Allow registration after the event has started option is off. If you are organizing a live event and want participants to be able to join the poll after the event has started, you should turn this option on.
4) Update the gameplay settings
On the Gameplay tab you can set the time.
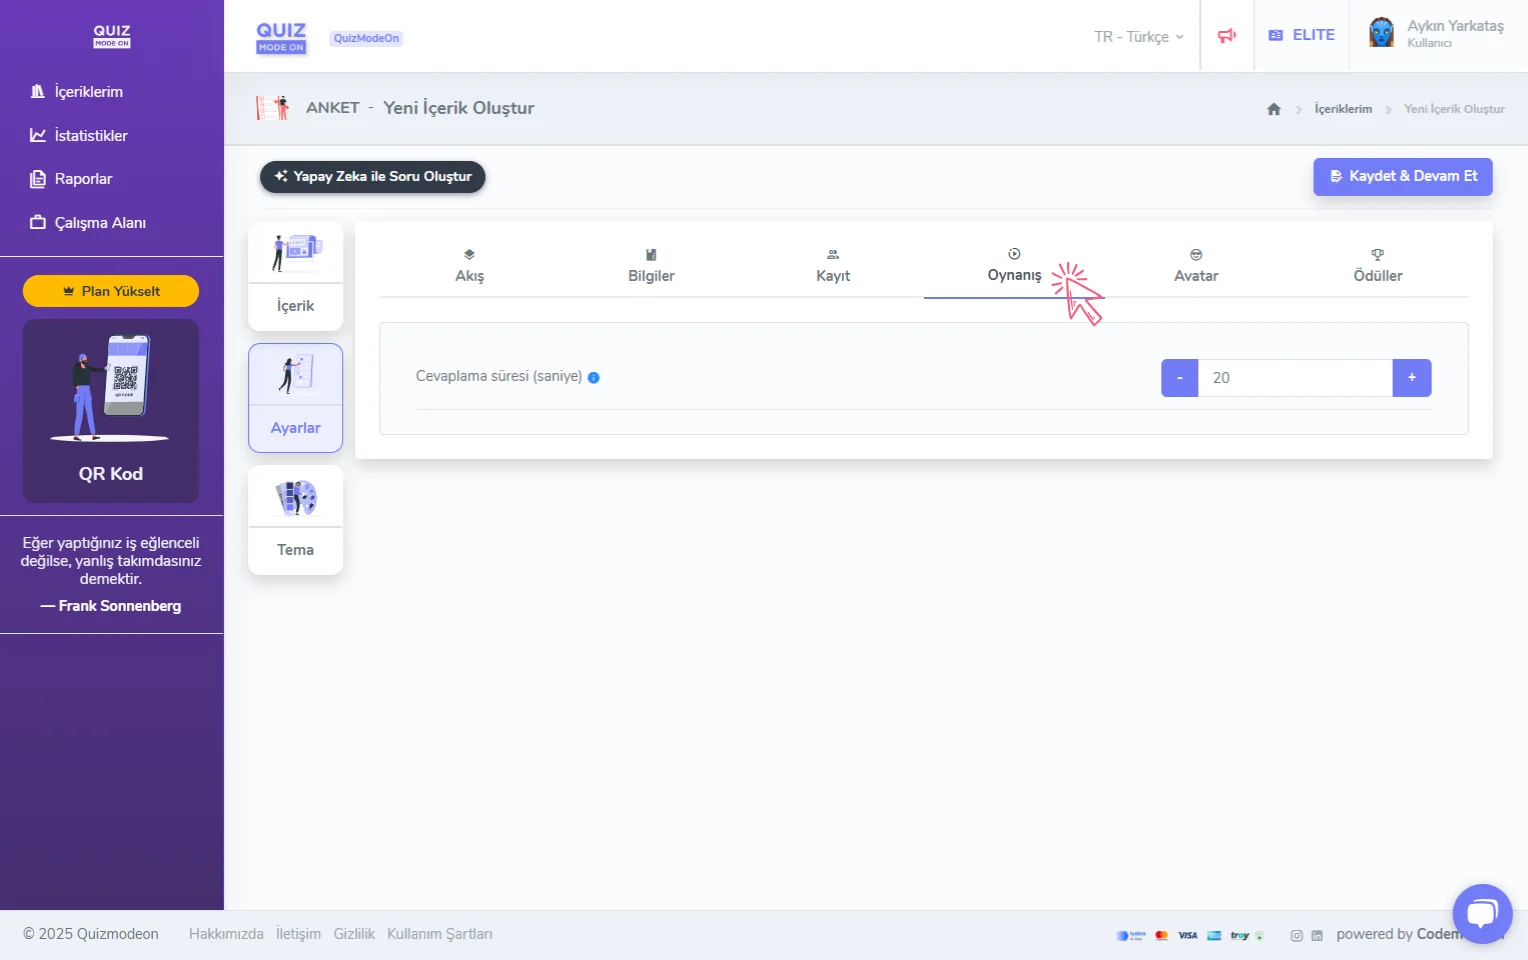
create a poll - settings - gameplay
- If the event flow is LIVE, the Answering time limit field is visible. In this field you can set a fixed time that applies to all questions. This value can be set to a minimum of 3 seconds and a maximum of 120 seconds.
- If the event flow is 24/7, the Add timer option appears inactive. In this case, participants can answer the questions whenever they want, independent of time. By turning this option on, you can set a fixed time that applies to all questions. This value can be set to a minimum of 3 seconds and a maximum of 120 seconds.
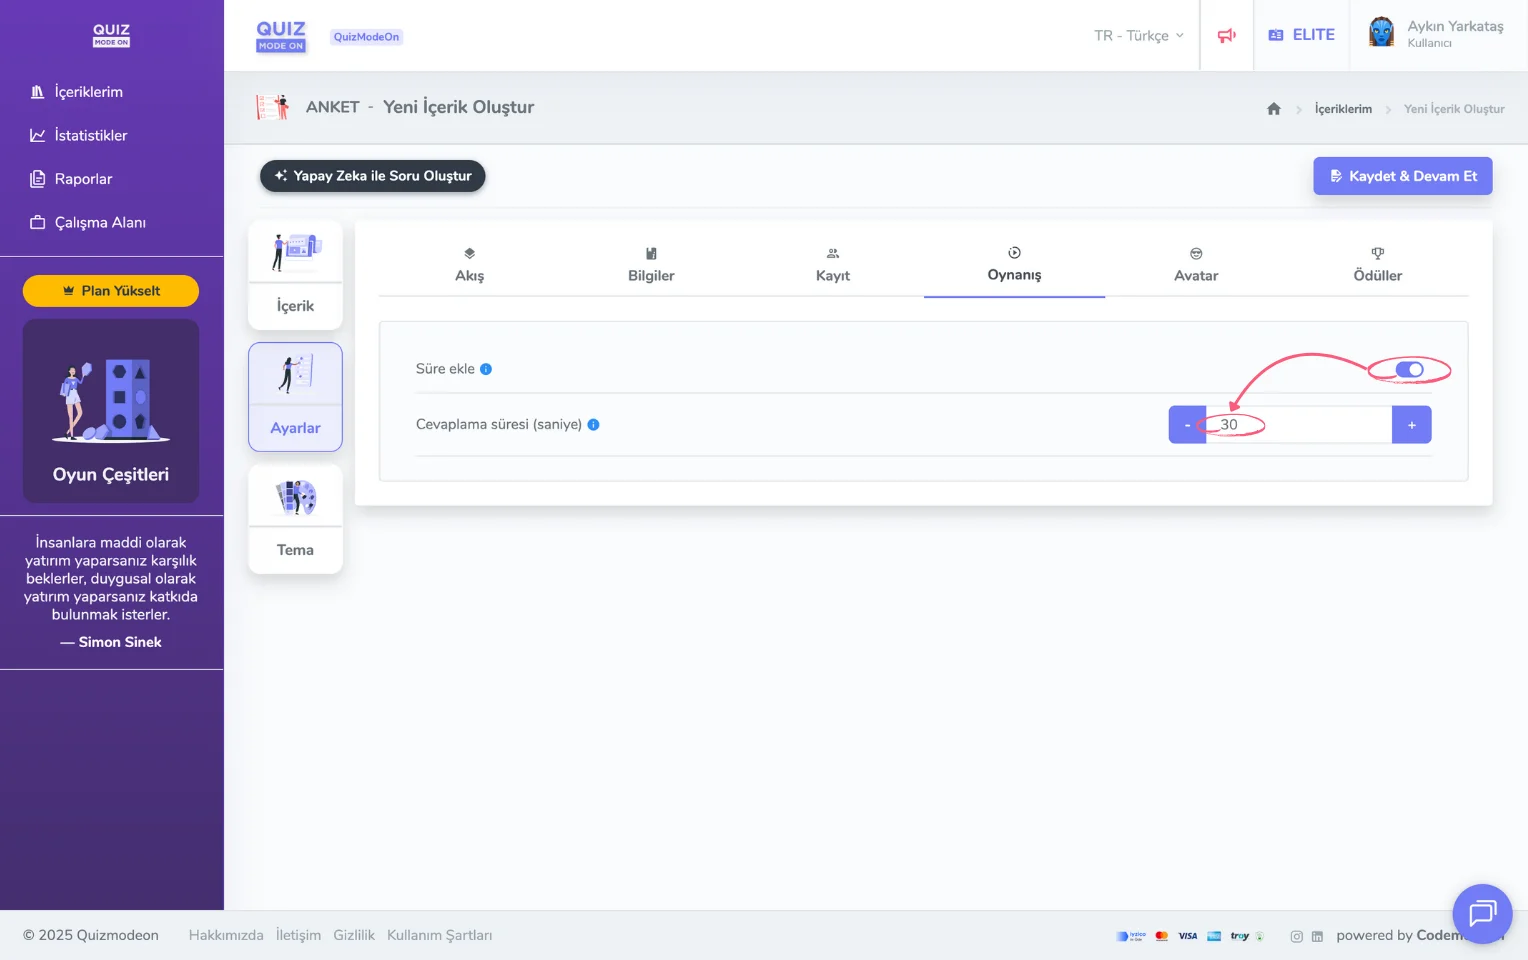
create a poll - settings - gameplay - adding an answering time
5) Choose one of the avatar sets
On the Avatar tab you can review the avatar sets participants can choose from on the login screen and choose one of the options here. With the View button you can quickly look at all the avatars in that avatar set. With the Select button you choose that avatar set.
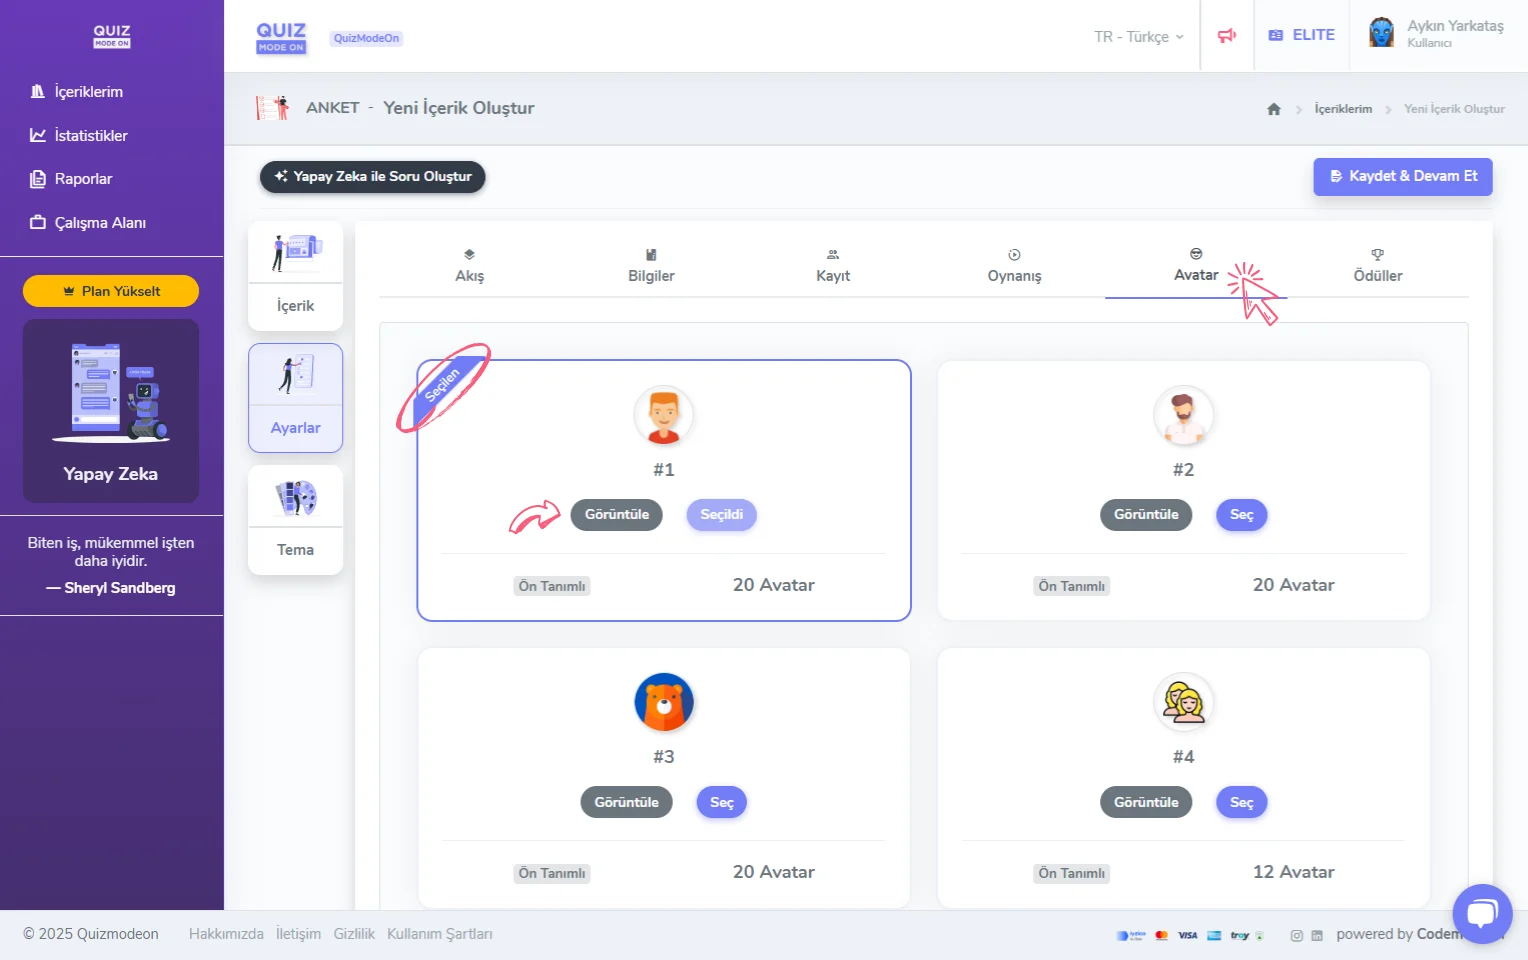
create a poll - settings - avatar - choosing an avatar set
6) Reward your participants
On the Rewards tab you can announce opportunities such as prizes and promotions you will give to participants.
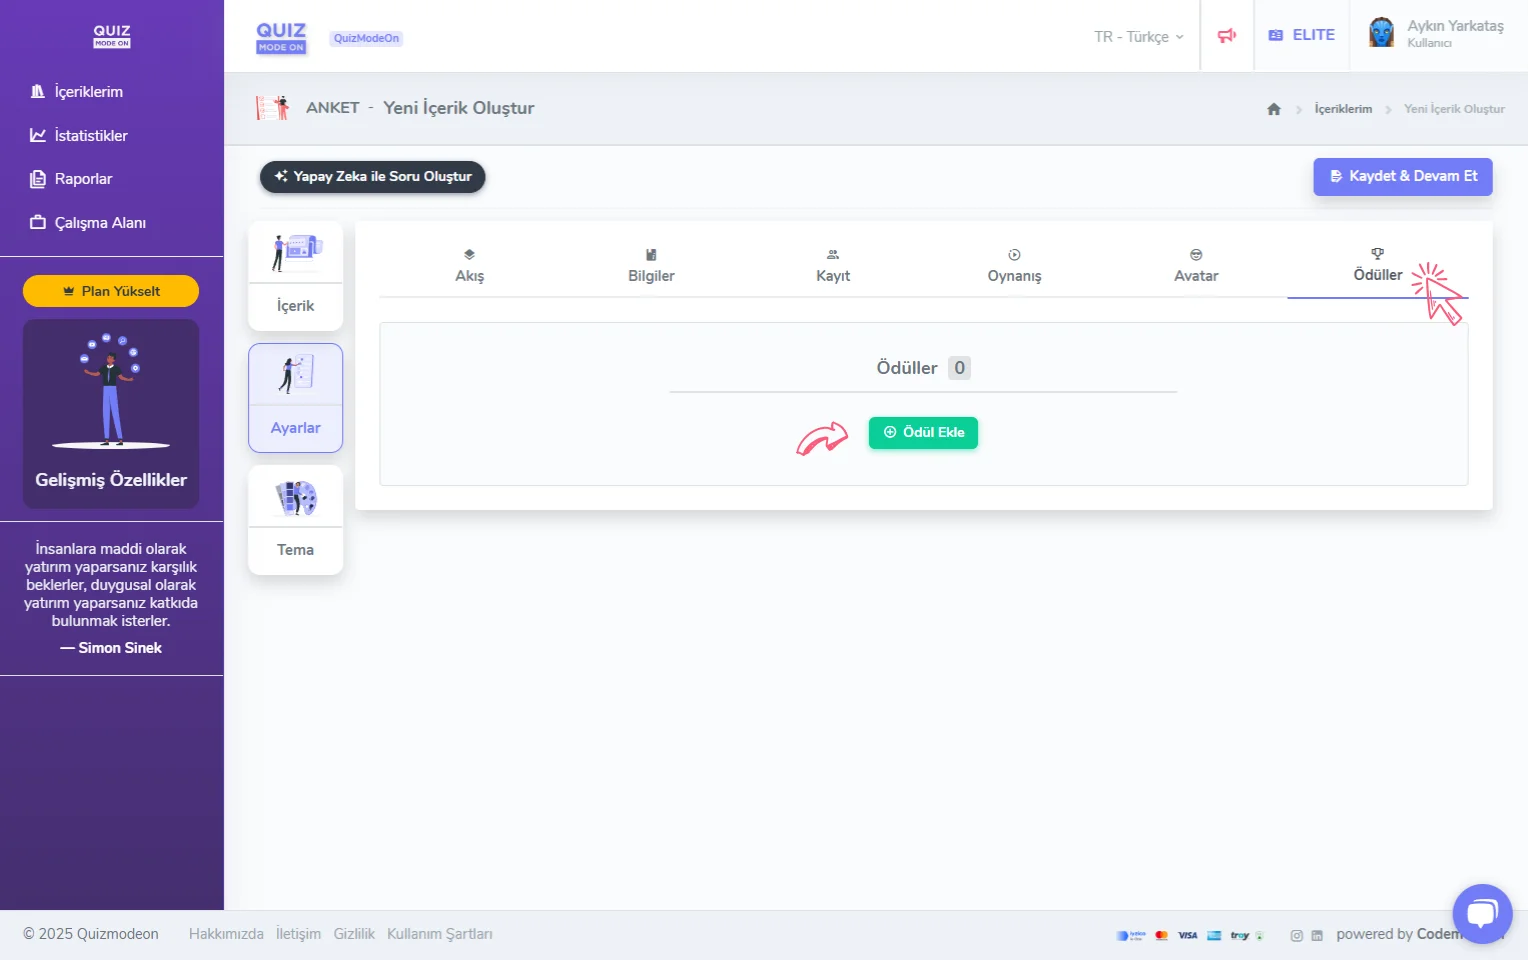
create a poll - settings - rewards
When you click the Add Reward button, Reward Title, Reward Name and Reward Description fields open, along with an Upload Image field. If you do not upload a reward-specific image, a default gift icon appears.
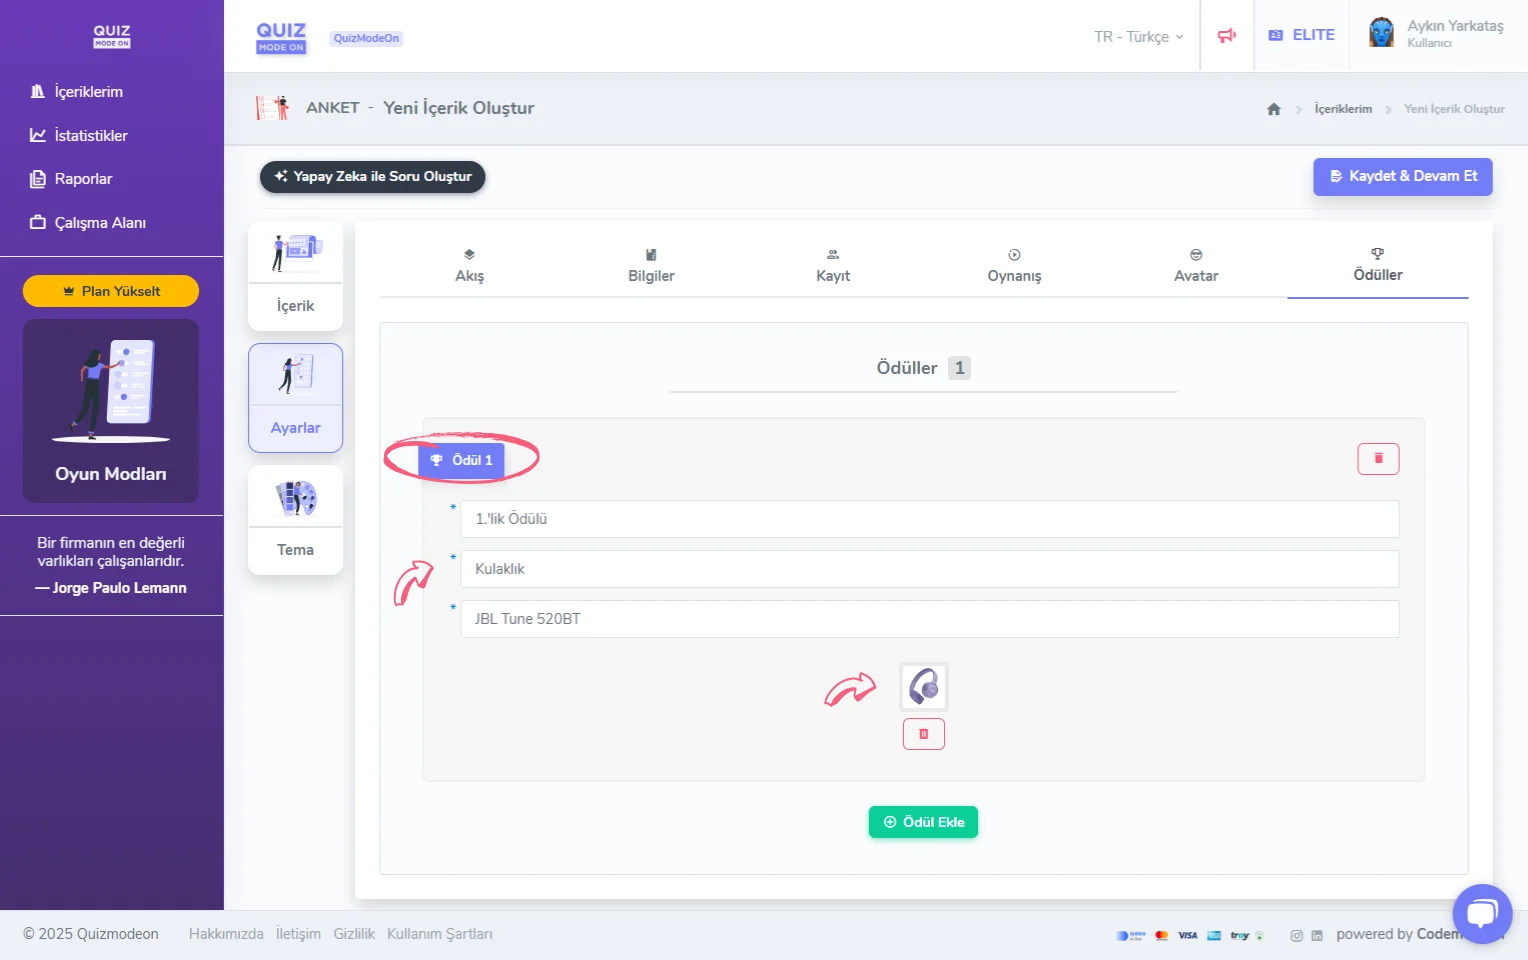
create a poll - settings - rewards - adding a reward
Note #1: When one or more rewards are defined, a Rewards button appears on the lobby screen and the final screen of both the moderator and the participants. When they click the Rewards button, a slider appears with the details of all the rewards.
Note #2: In events themed around collecting ideas rather than a competition concept, such as Poll, Word Cloud and Question and Answer, reward criteria such as the first 100 participants or 10 lucky participants are generally set for giving out rewards.